Runsheet
The Runsheet is a multi-track timeline for scheduling what happens in a project, and when. Instead of triggering things by hand you place events on tracks – play a sound, move the camera, set a parameter, fade a title in – and press START. The Runsheet then runs the whole sequence, and everything stays in step with the music because the timeline is measured in bars and beats as well as in seconds.
You edit the Runsheet in Editor Mode. A project can also run its Runsheet by itself when someone opens it, in Viewer Mode too (see Running a Runsheet below).
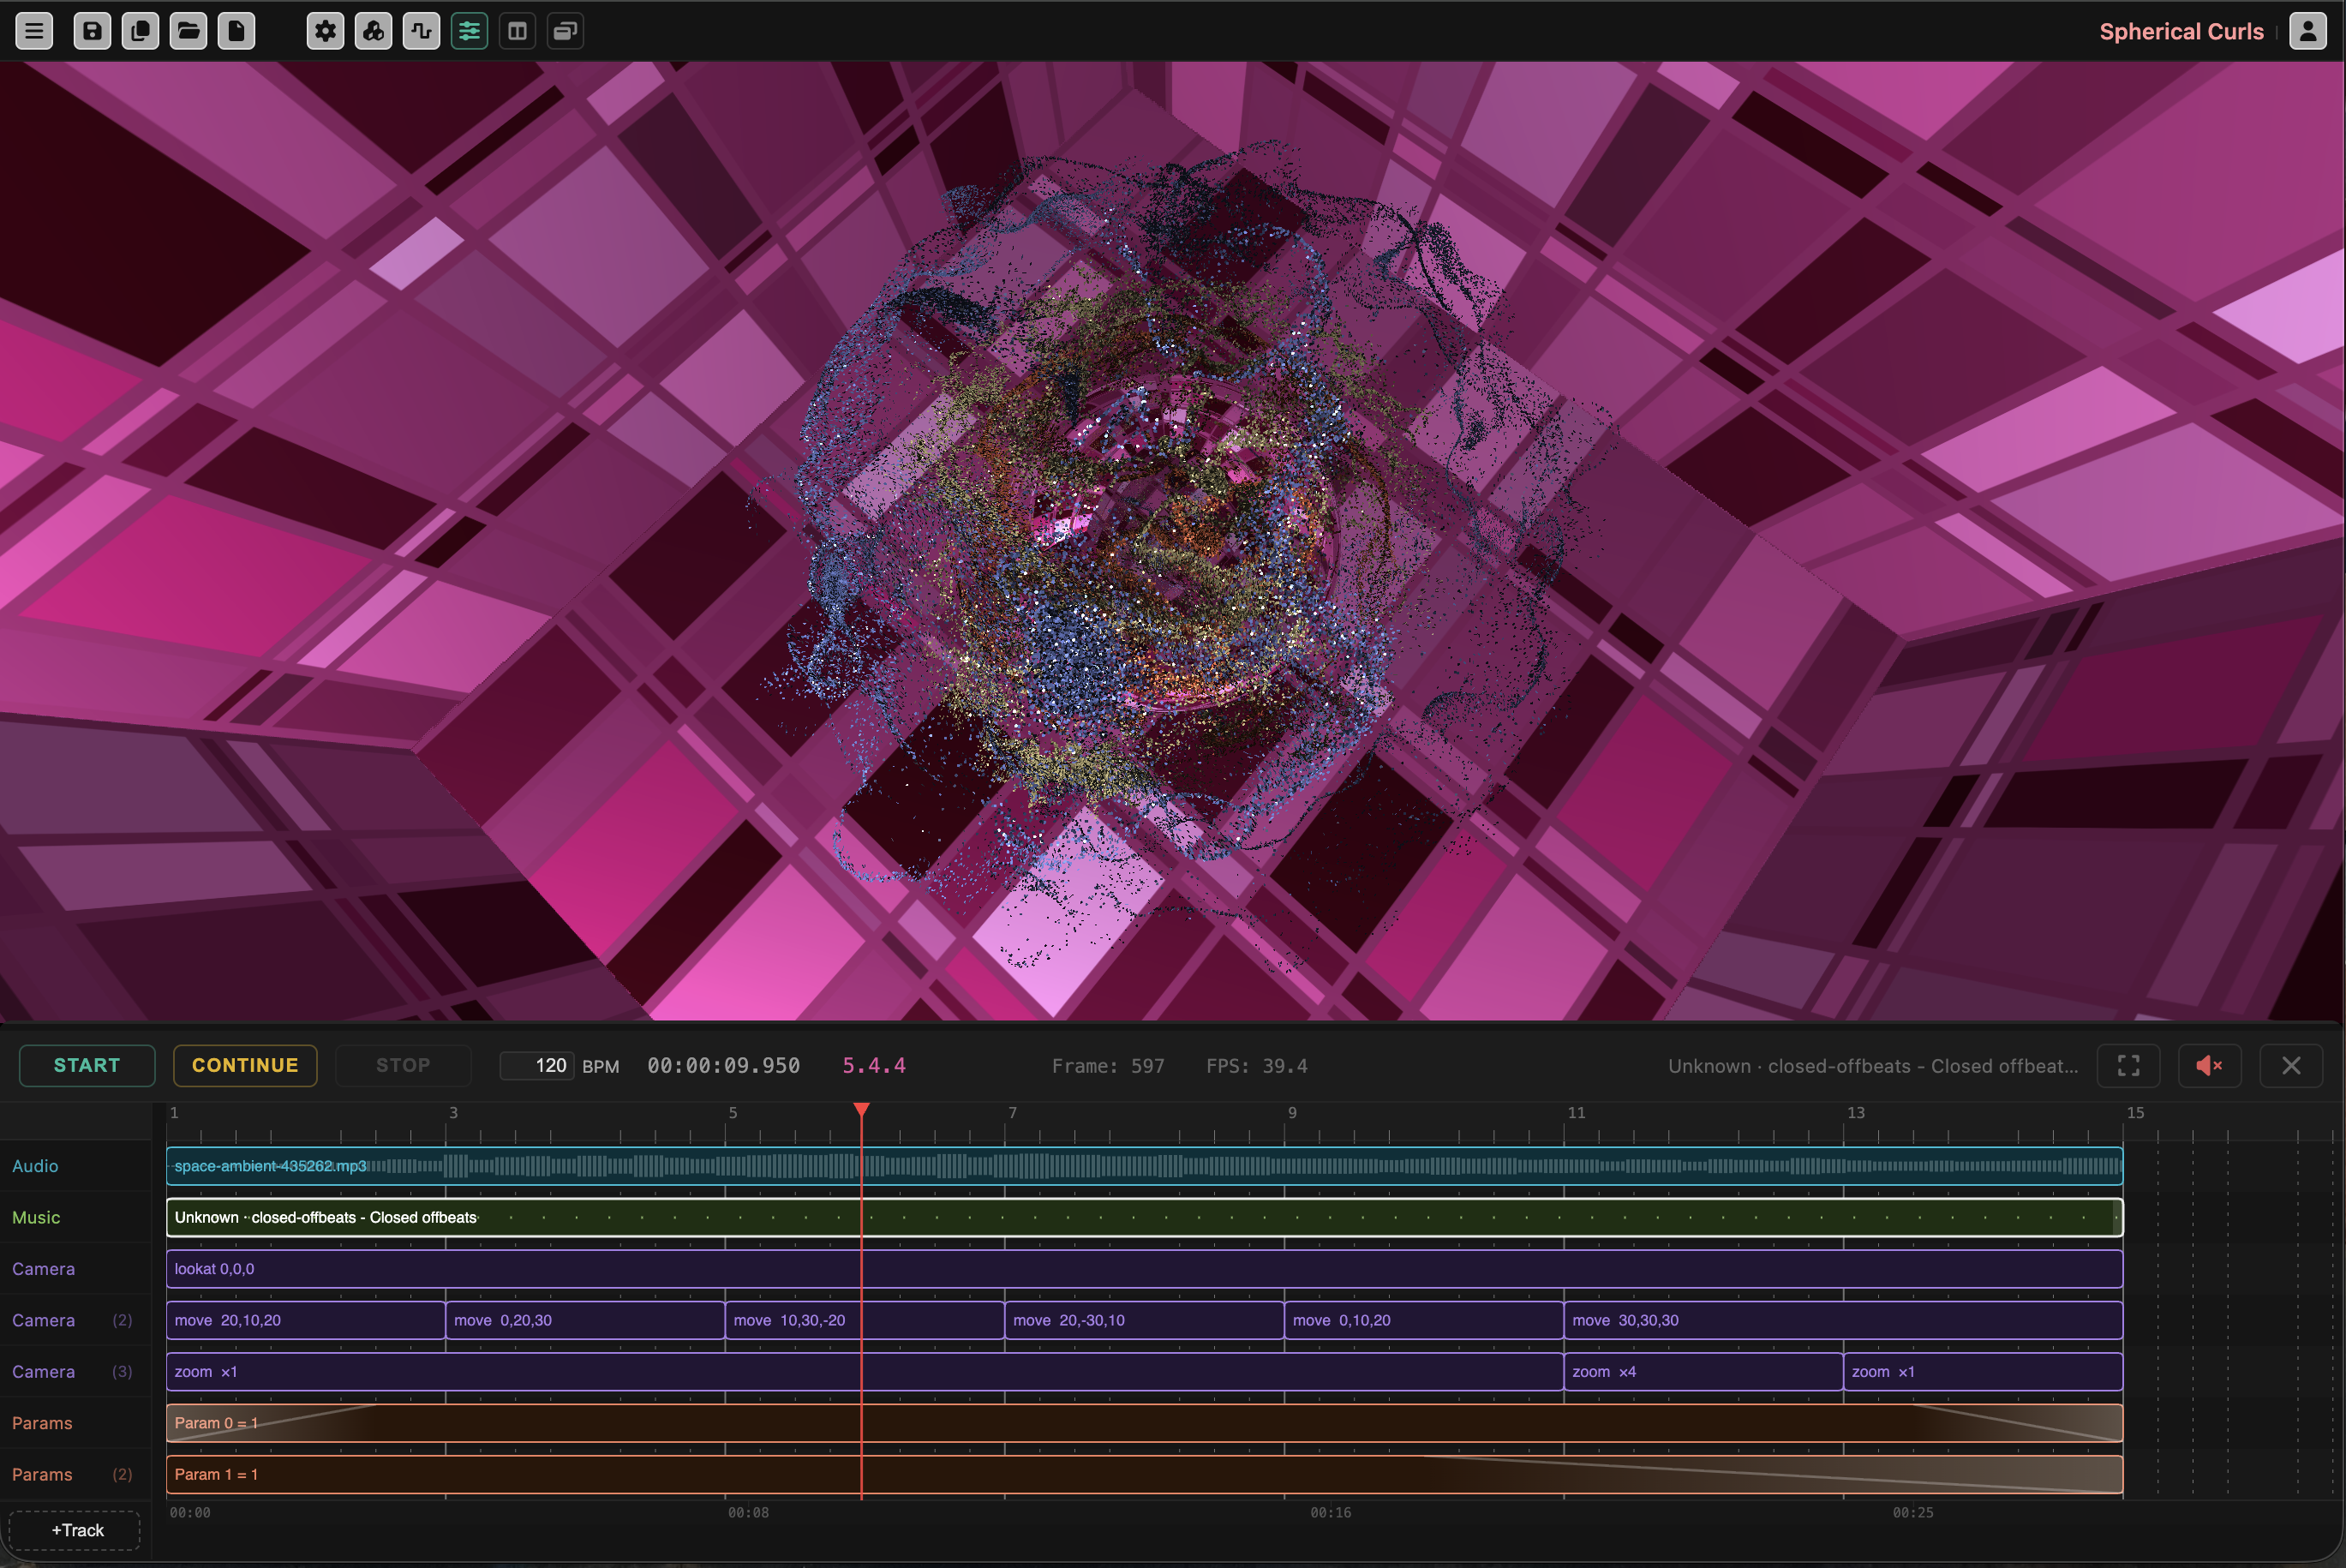
Open it with Toggle Runsheet in the Canvas Top Bar or the Drop-Down Menu (see Project Settings). It docks at the bottom of the Scene Viewer; drag its top edge to make it taller or shorter.
The Layout
The Header
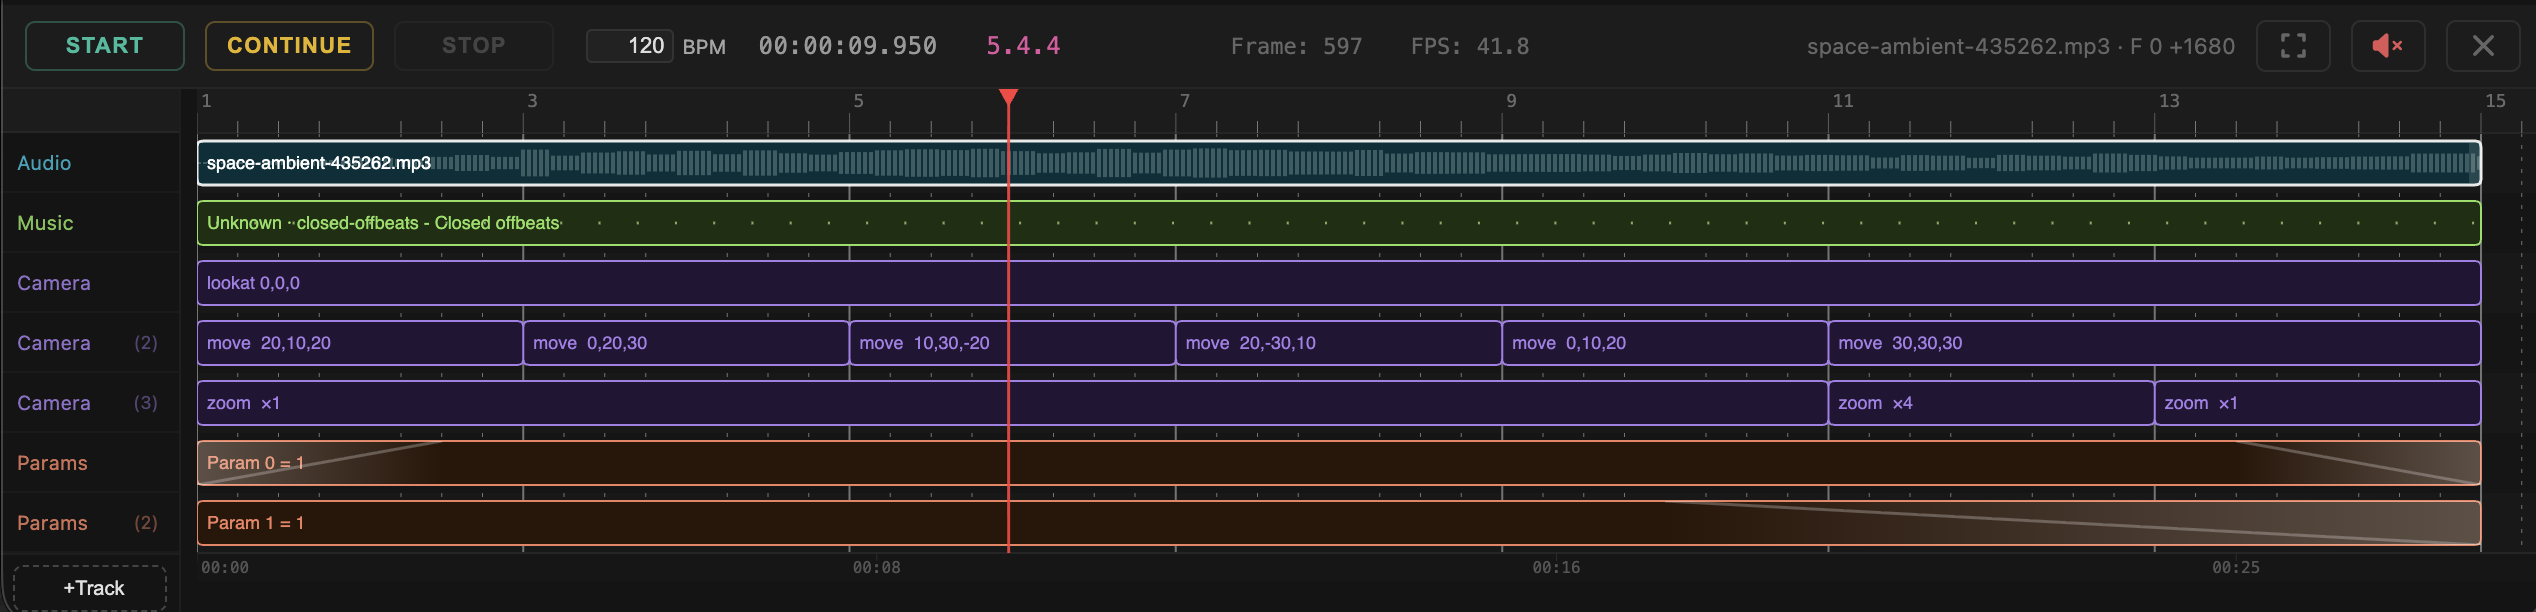
Along the top of the panel:
- START – runs the Runsheet from the very beginning.
- CONTINUE – runs it from where the playhead is now (after a pause, or after you clicked somewhere on the timeline).
- STOP – stops the run and silences everything that is playing.
- BPM – the tempo of the project, from 20 to 999 beats per minute. See Bars, Beats and Seconds.
- The clock (hours, minutes, seconds and thousandths), the bar.beat.sub counter (for example 3.2.1: bar 3, beat 2, sixteenth 1), the frame number and the current frame rate.
- On the right: the selection (how many events are selected), Scale to fit to fit all the events into the width of the panel, Audio to switch sound on and off (the same as the Audio button in the Media Bar), and Close .
The Tracks
Each row is a track, with its name on the left. Its color tells you the kind:
| Track | What its events do |
|---|---|
| Recording | Record the run to a video file. |
| Audio | Play an audio file (or the sound of a video file). |
| Music | Play a live instrument, one note or chord, or a whole clip of notes. See the Instruments and Music chapter. |
| Video | Play a video file as a picture, for use in a shader. |
| Camera | Animate, move, aim, turn, orbit or zoom the camera. |
| Params | Set one of the project’s parameters to a value for a while. |
| Objects | Choose which objects are visible. |
| Title, Background, Text, Nodes, Logo, QR Code | Overlays drawn on top of the scene. |
Some kinds allow several tracks of the same kind. You can have up to eight Audio and eight Music tracks, four Video, eight Camera, sixteen Params, eight Text and four QR Code tracks. The extra ones are named Audio 2, Audio 3 and so on. The Recording, Objects, Title, Background, Nodes and Logo tracks exist only once.
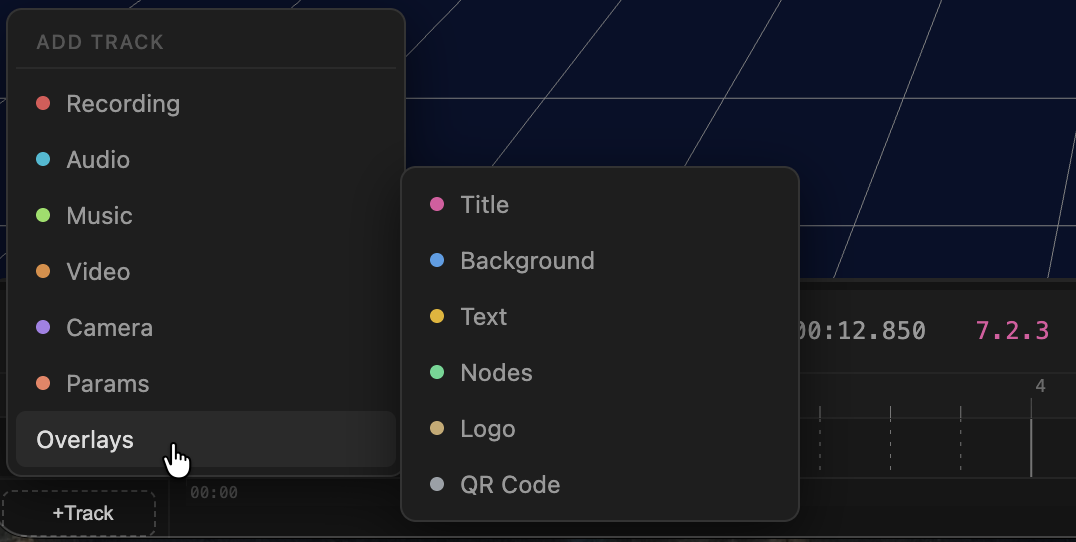
Click +Track at the bottom of the label column to add a track; the list shows what is still available. The six overlay tracks are kept together in an Overlays submenu. To remove a track, right-click its lane and choose Remove … track. When there are more tracks than fit, a small arrow appears at the top or bottom of the labels, and the mouse wheel scrolls the tracks.
The Ruler and the Playhead
The ruler along the top shows bars, and beats when you zoom in. Click or drag anywhere on the ruler, or on an empty part of a track, to move the playhead. While the Runsheet is stopped, moving the playhead lets you see the scene as it will look at that moment.
- Zoom with Ctrl (or Cmd) and the mouse wheel.
- Scroll the timeline sideways with a sideways swipe or drag, and scroll the tracks up and down with the mouse wheel.
Working with Events
Adding an Event
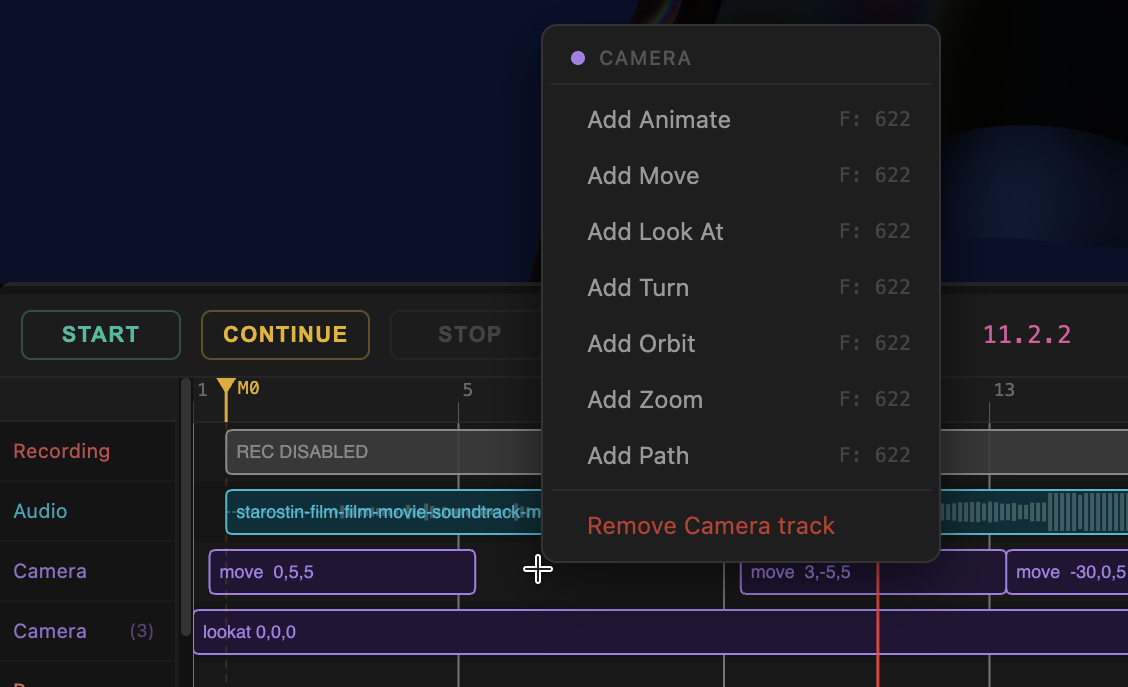
Double-click (or right-click) an empty spot on a track to get the menu of that track, and choose Add … for the kind of event you want. The Camera track offers Animate, Move, Look At, Turn, Orbit, Zoom and Path. The Music track also offers Add Music from MIDI – see the Instruments and Music chapter.
A new event starts at the whole bar nearest to where you clicked, and lasts two bars.
Moving, Resizing and Selecting
- Move an event by dragging it. Drag it up or down to another track of the same kind.
- Resize it by dragging its right edge.
- Click an event to select it. Shift-click adds it to, or removes it from, the selection. Dragging one of several selected events moves them all together.
- An amber line shows when the edge you are dragging snaps to something: the edge of another event, a marker, or a bar or beat line.
- On an Audio or Video event, hold Alt and drag to slip the content (change where in the file the event starts playing) without moving the event itself.
Ctrl/Cmd+C and Ctrl/Cmd+V copy and paste the selected event. Delete or Backspace removes the selection. D switches the selected events off and on, and a switched-off event stays on the timeline but is skipped, which is handy when you are trying things out. You can also do this from the right-click menu (Disable / Enable selected).
The Event Inspector
Double-click an event to open its inspector, a small floating panel that you can drag out of the way. Its title says which track and which kind of event it belongs to. Most of what an event does is set there. The fields depend on the kind of event, but a few appear almost everywhere:
- Active – Yes or No, the same as switching the event off with D.
- Start and Duration – where the event begins and how long it lasts. Both have a unit next to them.
- Fade In and Fade Out (Ease In and Ease Out for camera and parameter events) – how long the event takes to reach full strength and to let go again.
Bars, Beats and Seconds
Every time field has a unit menu: seconds, bars or beats. A bar is normally four beats. New events use bars, so an event placed on bar 5 is on bar 5 whatever the tempo.
That is the point of the BPM field. When you change the tempo, everything set in bars or beats moves and stretches with it: events start later or earlier, loops get longer or shorter, and fades follow. Anything set in seconds stays where it is. So if you decide the song should be faster, change the BPM once, and the whole arrangement follows.
Switching a field from one unit to another keeps the same moment in time, and only changes how the number is shown.
Here is one project at 120 BPM and at 90 BPM, with the playhead at the same time (9.5 seconds) in both. At the slower tempo a bar lasts longer, so the same moment falls in an earlier bar, and every event, having the same length in bars, stretches to fill the longer bars.


Loop Length and Loop Gap use the same units. Set the loop length of an audio or music event to 4 beats and it repeats every four beats, at any tempo.
Loops, Fades and Volume
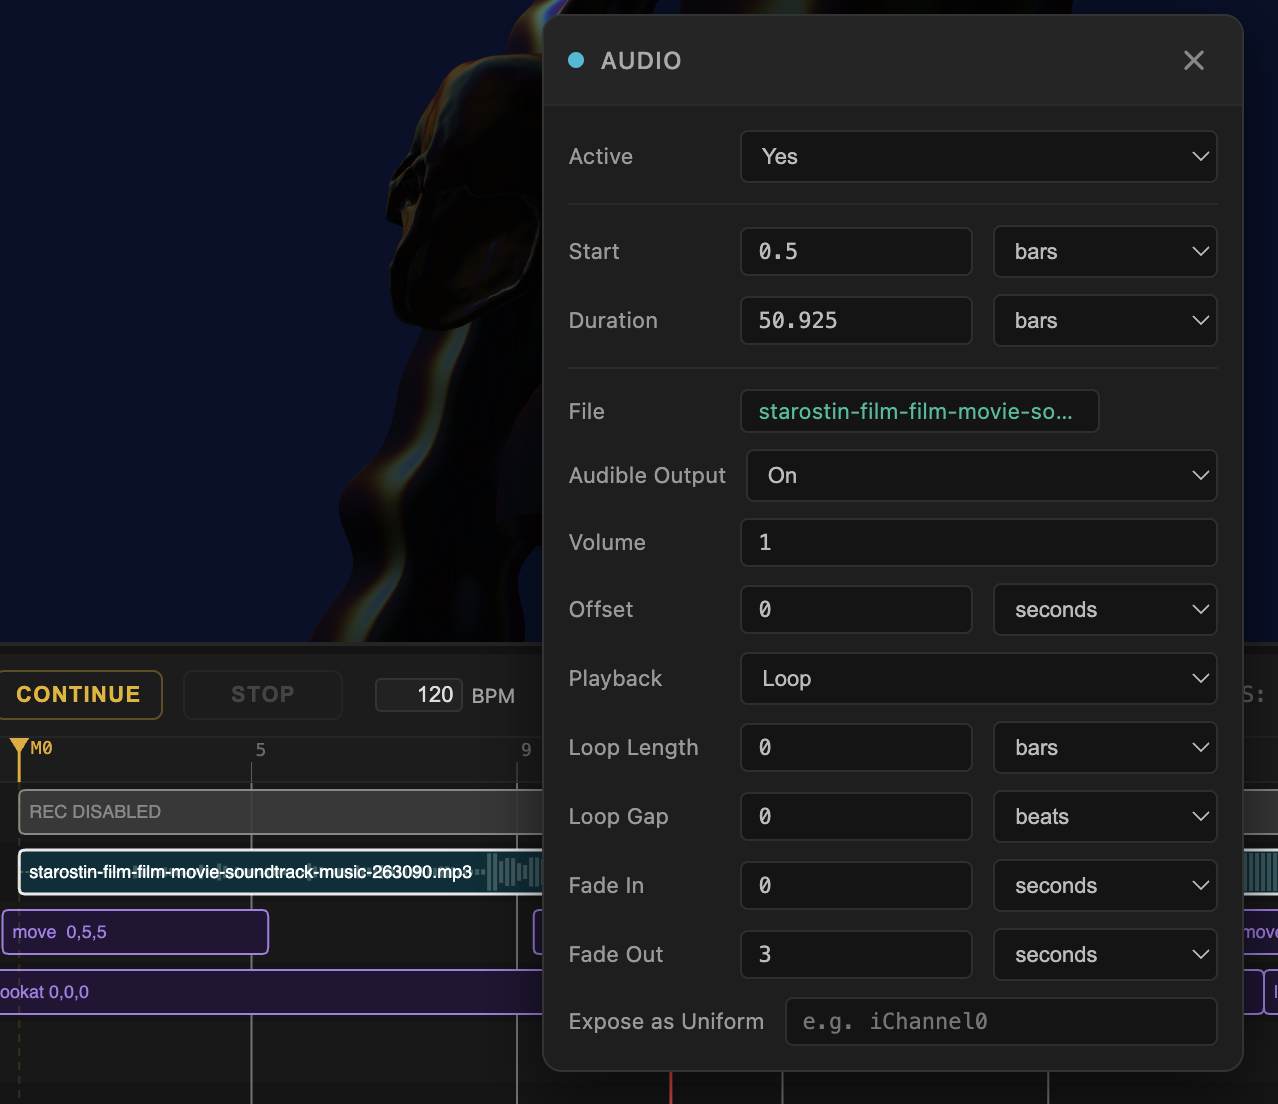
Events that play something over time (Audio, Music and Video) share a few settings:
- Playback – Loop repeats for as long as the event lasts; Once plays it a single time.
- Loop Length – how long one repetition is. Until you set it, one repetition is as long as the event, so nothing repeats. Set a shorter length to repeat only the first part of a file, or of a note clip.
- Loop Gap – silence between repetitions. Zero means the loop is seamless.
- Offset – where in the file to start (Audio and Video). Alt-dragging the event on the timeline changes the same thing.
- Fade In and Fade Out – smooth start and end.
- Volume – a multiplier (1 is full).
- Audible Output – On or Muted. A muted event makes no sound, but its sound is still analyzed, so a shader that reacts to that track keeps reacting. That is how you can use a drum loop that you never hear, only see.
The Kinds of Events
Recording
While a run passes through a Recording event, the project is recorded to a video file (with the sound, if audio is on). The event shows REC on the timeline, or a greyed REC DISABLED when its Active is set to No. See Recording under Project Settings for quality and speed.
Audio
Plays an audio file, or the sound of a video file. Click File to pick one from the Storage Directory. Expose as Uniform gives the event’s sound spectrum a name that every shader in the project can read as a texture, which is how a pasted shader that expects, for example, iChannel0 can be pointed at your music. The Runsheet Track nodes read the sound of any audio track without needing this.
Music
Plays an instrument that you built or picked from the library, either a single Note or chord, or a note clip. This has its own chapter: Instruments and Music.
Video
Plays a video file as a texture, silent by default. To see it, add a Runsheet Video node to a shader: it provides the picture that the track is playing right now. To hear the video’s sound, put an Audio event on the same file.
Camera
All camera events run for their duration, and take over the camera while they are active.
- Animate – follows the camera path from the Camera Animation panel, at its own Speed, starting from Position (from 0, the start of the path, to 1, its end).
- Move – moves the camera in a straight line from Start to End.
- Look At – aims the camera at a point that travels from Start to End.
- Turn – turns the viewing direction from Start to End.
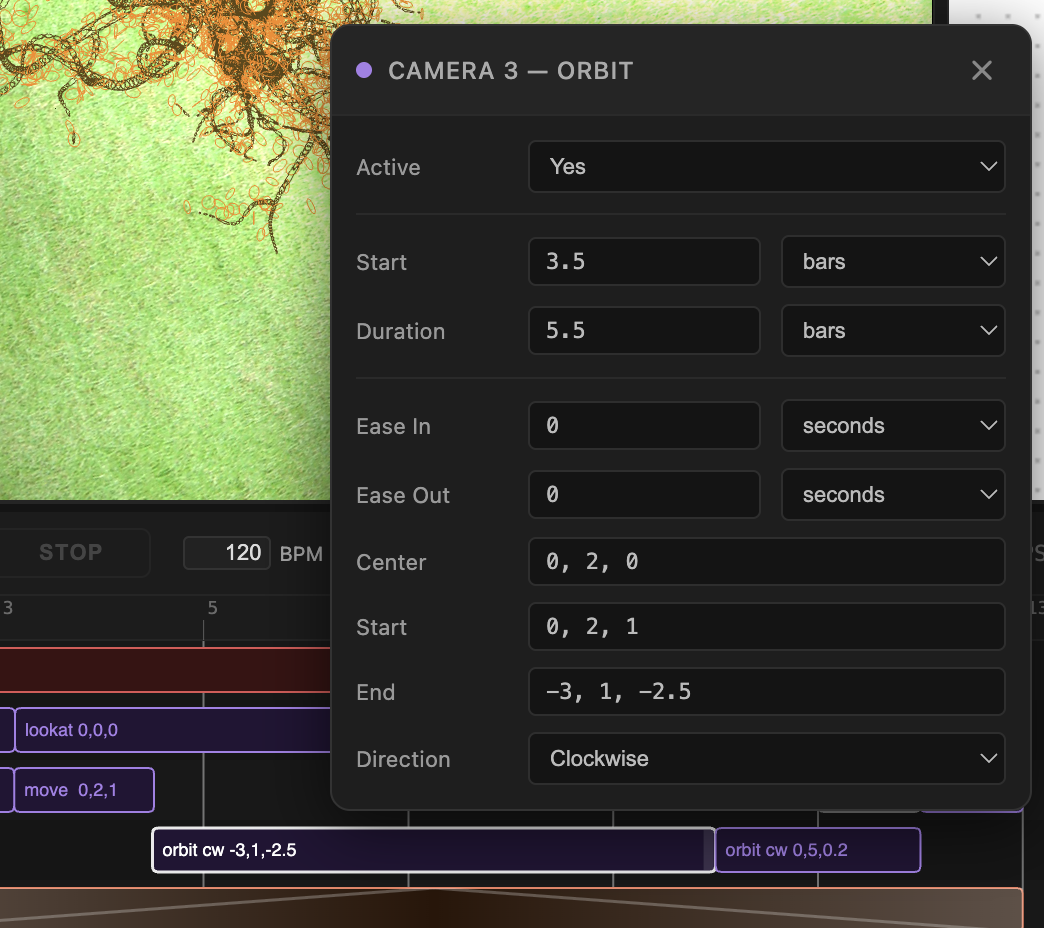
- Orbit – circles around a Center, from Start to End, clockwise or counter-clockwise.
- Zoom – changes the zoom from Start Zoom to End Zoom.
- Path – a smooth curve through your own Waypoints. Click Edit in 3D View to place the points by dragging them in the scene.
Ease In and Ease Out make the movement start and stop gently.
Params
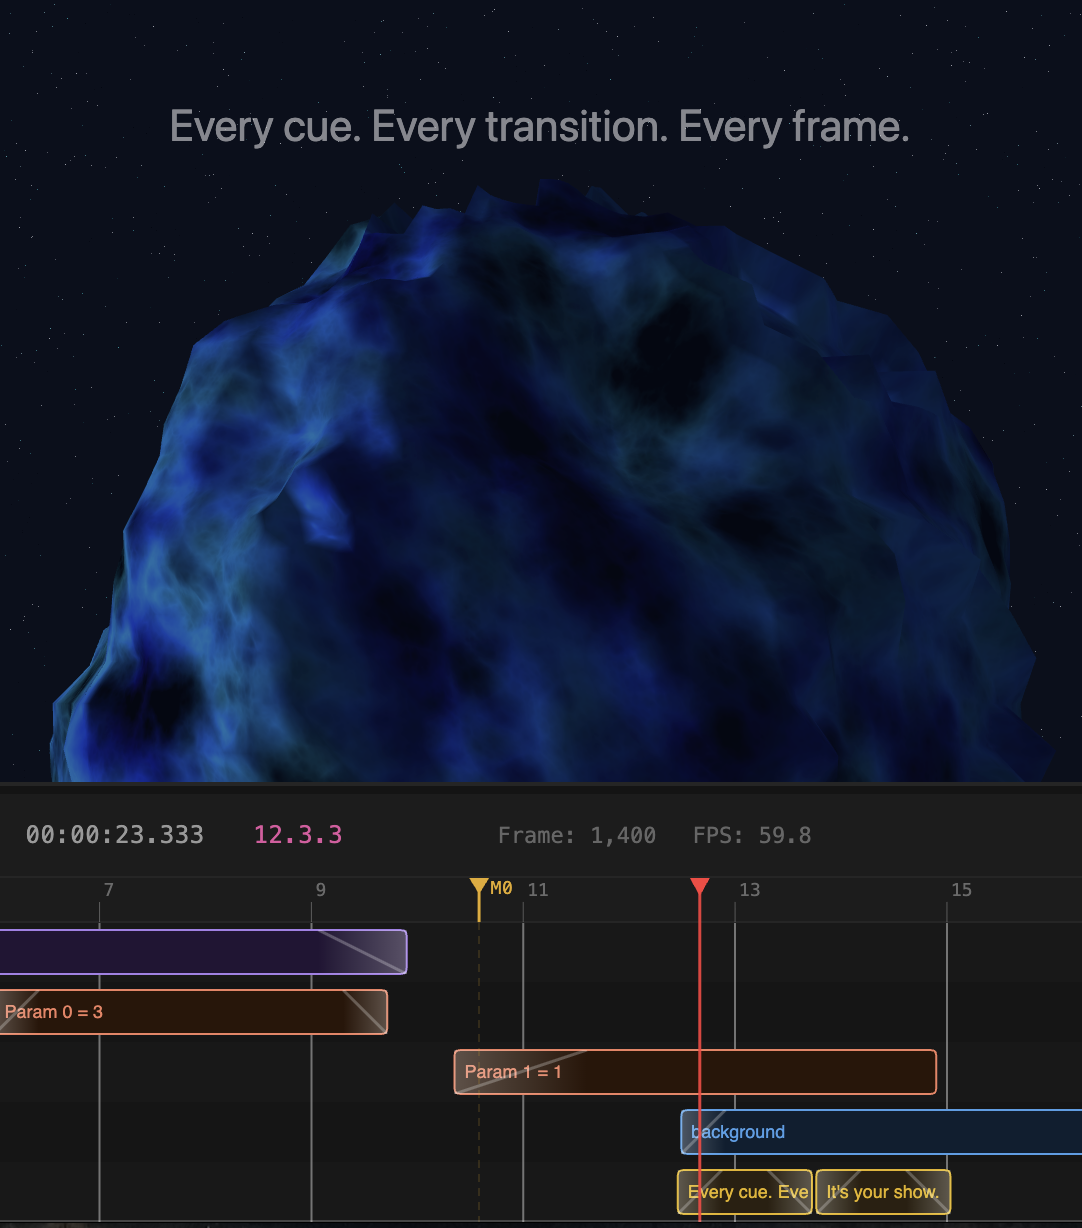
A Value event sets one of the project’s 64 parameters. Choose which in Param (Rename Param gives it a name that you will recognize), and the Value it should reach. The parameter eases in to the value, holds it, and eases back to zero, and it is zero whenever no event is active. Any Param node in a shader or an instrument can read it, which is how the Runsheet controls what your nodes do.
Objects
A Visible Objects event decides which objects are shown while it is active. Objects that are not in its list are hidden until the event ends.
Overlays
The overlay tracks draw on top of the scene while their event is active.
- Title – the project’s name together with the time, frame and tempo.
- Background – a full-frame color, gradient or animated background (solid, linear, radial, shimmer or aurora).
- Text – your own text, with Font size, Y position and Color.
- Nodes – shows the node network of an object, cycling through the objects (or staying on one Object you choose) at the interval you set in Switch every.
- Logo – the VerkLabs Designer wordmark, in a color you choose, with a Y position.
- QR Code – a QR code for a Data / URL you type, with Size, position, colors, an Error correction level, and optional animation (rings, pulse, orbit, bars, spinner).
Overlays fade in and out, 25 frames each by default.
Markers
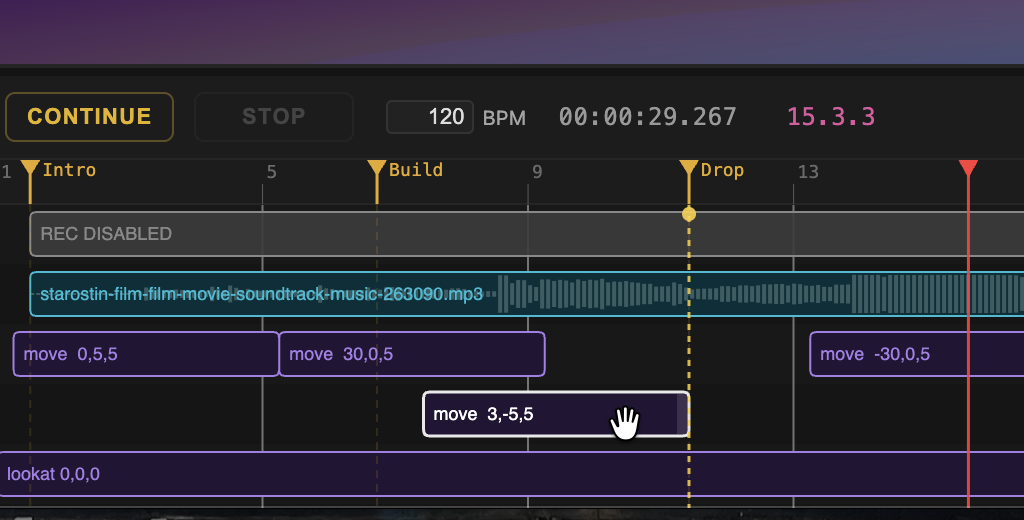
A marker is a named flag on the ruler, for marking the sections of a song, or a place you want to come back to. Right-click the ruler and choose Add marker here. Right-click a marker to Rename it, Move it to the playhead, or Remove it.
Markers are also handles. Drag a marker, and every event to the right of it moves with it, so you can make room for a new section in the middle of an arrangement, or take one out. Hold Shift while dragging to move only the marker. Events snap to markers when you drag them close.
Running a Runsheet
Press START to run from the beginning, CONTINUE to run from the playhead, and STOP to stop. While it runs, the playhead moves, the scene follows the events, and the header shows the clock and the bar and beat.
Two settings in Project Settings decide what happens when a project is opened: Run on Load starts the Runsheet automatically, and Run Loop starts it over again when it ends. Together they make a project that plays by itself when someone opens its link.
Rec. Runsheet shows the Runsheet itself as a strip under the picture in a recording, which is useful for showing how a project was put together.
Sound needs the Audio button to be on, since browsers do not allow a page to make sound until you have asked for it. If it is off, the Runsheet shows an Enable audio prompt the first time something wants to play.
Sound in a Recording
When you record a run, every Audio and Music event is rendered into the recording’s sound track. Instruments are calculated in advance, exactly as they sound live, so what you hear while it runs is what ends up in the video.